建议阵容 (1)芬(2)芬角堂
(1)中路芬 极冷 电池 盾修 舰长:卡琳
(2)边路芬 强袭 主炮 炎龙 舰长:所长/黑医
独角 紫防 盾修 电池 舰长:博士
圣堂 盾修 隐身/静滞 无人机网络
圣堂舰长 公主 独角自动 3阶中和激光炮4 3阶撤甲1 圣堂自动(盾修 隐身 无人机网络) 3阶加农1 3阶撤甲1 2阶撤甲3/(盾修 静滞 无人机网络)3阶撤甲2 3阶加农*1
不朽

建议阵容 (1)芬(2)芬角堂
(1)中路芬 极冷 电池 盾修 舰长:卡琳
(2)边路芬 强袭 主炮 炎龙 舰长:所长/黑医
独角 紫防 盾修 电池 舰长:博士
圣堂 盾修 隐身/静滞 无人机网络
圣堂舰长 公主 独角自动 3阶中和激光炮4 3阶撤甲1 圣堂自动(盾修 隐身 无人机网络) 3阶加农1 3阶撤甲1 2阶撤甲3/(盾修 静滞 无人机网络)3阶撤甲2 3阶加农*1
1.可以直接将其中的.git文件找出并删除
2.还可以通过命令的方式来操作。如下
你需要先打开项目文件,
然后,在文件中选择git bash here,进入git命令
git会进入当前文件目录,
然后执行如下命令:
find . -name “.git” | xargs rm -Rf
该项目就会去除git的版本控制了。再修改的话也不会影响git的版本库。
]]>//我的世界python目前只能用2.7版本,不能使用3版本。先激活python27环境
conda activate python27
//补全库
python -m pip install mc-netease-sdk
//升级库
python -m pip install --upgrade mc-netease-sdk
pip安装包显示异常
(python27) D:\pyspace>python -m pip install mc-netease-sdk
Traceback (most recent call last):
  File "D:\apps\anaconda3\envs\python27\lib\runpy.py", line 174, in _run_module_as_main
    "__main__", fname, loader, pkg_name)
  File "D:\apps\anaconda3\envs\python27\lib\runpy.py", line 72, in _run_code
    exec code in run_globals
  File "D:\apps\anaconda3\envs\python27\lib\site-packages\pip\__main__.py", line 19, in <module>
    sys.exit(pip.main())
  File "D:\apps\anaconda3\envs\python27\lib\site-packages\pip\__init__.py", line 233, in main
    cmd_name, cmd_args = parseopts(args)
  File "D:\apps\anaconda3\envs\python27\lib\site-packages\pip\__init__.py", line 159, in parseopts
    parser = create_main_parser()
  File "D:\apps\anaconda3\envs\python27\lib\site-packages\pip\__init__.py", line 137, in create_main_parser
    parser = ConfigOptionParser(**parser_kw)
  File "D:\apps\anaconda3\envs\python27\lib\site-packages\pip\baseparser.py", line 148, in __init__
    self.config.read(self.files)
  File "D:\apps\anaconda3\envs\python27\lib\ConfigParser.py", line 305, in read
    self._read(fp, filename)
  File "D:\apps\anaconda3\envs\python27\lib\ConfigParser.py", line 512, in _read
    raise MissingSectionHeaderError(fpname, lineno, line)
ConfigParser.MissingSectionHeaderError: File contains no section headers.
file: C:\Users\dongyiliang\pip\pip.ini, line: 1
' [global]\n'
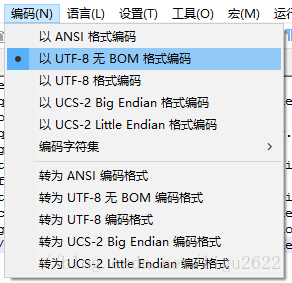
用ConfigParser读取配置文件的程序调用后发现文件头部被追加了信息:\xef\xbb\xbf,然后ConfigParser解析出错 \xef\xbb\xbf的出现原因:在Window下记事本、notepad++等文本编辑器编辑后,若保存为不同的编码格式会在文件开头加上BOM
UNICODE: \xFF\xFE
UTF-8:\xEF\xBB\xBF
用notepad++将文件编码修改为以UTF-8无BOM格式编码,然后保存文件就行了。
[global]
index-url = https://pypi.doubanio.com/simple/
[install]
trusted-host=pypi.doubanio.com
git clone https://github.com/flutter/flutter.git -b stable
下面是国内几个镜像, PUB_HOSTED_URL是Dart依赖包地址 FLUTTER_STORAGE_BASE_URL是Flutter依赖文件地址。
要手动下载最新版本的flutter SDK包,可以访问 FLUTTER_STORAGE_BASE_URL 地址,然后进入/flutter_infra/releases/目录下载(这个方式Flutter社区不可用)。
Flutter 社区 社区主镜像,采用多种方式同步 Flutter 开发者资源(推荐)。 $ export PUB_HOSTED_URL=https://pub.flutter-io.cn $ export FLUTTER_STORAGE_BASE_URL=https://storage.flutter-io.cn
上海交大 Linux 用户组 使用反向代理方式建立的 Flutter 镜像,数据与站源实时同步。 Pub API 返回值未做处理,可能造成无法访问的情况。
$ export PUB_HOSTED_URL=https://dart-pub.mirrors.sjtug.sjtu.edu.cn $ export FLUTTER_STORAGE_BASE_URL=https://mirrors.sjtug.sjtu.edu.cn
$ export PUB_HOSTED_URL=https://mirrors.tuna.tsinghua.edu.cn/dart-pub $ export FLUTTER_STORAGE_BASE_URL=https://mirrors.tuna.tsinghua.edu.cn/flutter
$ export PUB_HOSTED_URL=http://mirrors.cnnic.cn/dart-pub $ export FLUTTER_STORAGE_BASE_URL=http://mirrors.cnnic.cn/flutter
$ export PUB_HOSTED_URL=https://mirrors.cloud.tencent.com/dart-pub $ export FLUTTER_STORAGE_BASE_URL=https://mirrors.cloud.tencent.com/flutter
]]># 方法一:手动替换地址
#原地址
$ git clone https://github.com/kubernetes/kubernetes.git
#改为
$ git clone https://github.com.cnpmjs.org/kubernetes/kubernetes.git
#或者
$ git clone https://hub.fastgit.org/kubernetes/kubernetes.git
#或者
$ git clone https://gitclone.com/github.com/kubernetes/kubernetes.git
# 方法二:配置git自动替换
$ git config --global url."https://hub.fastgit.org".insteadOf https://github.com
# 测试
$ git clone https://github.com/kubernetes/kubernetes.git
# 查看git配置信息
$ git config --global --list
# 取消设置
$ git config --global --unset url.https://github.com/.insteadof
# 原地址
wget https://github.com/goharbor/harbor/releases/download/v2.0.2/harbor-offline-installer-v2.0.2.tgz
# 加速下载方法一
wget https://download.fastgit.org/goharbor/harbor/releases/download/v2.0.2/harbor-offline-installer-v2.0.2.tgz
# 加速下载方法二
wget https://hub.fastgit.org/goharbor/harbor/releases/download/v2.0.2/harbor-offline-installer-v2.0.2.tgz

//测试1
https://hub.fastgit.org/ipfs-desktop/releases/download/v0.20.6/IPFS-Desktop-Setup-0.20.6.exe

https://github.com/ipfs-shipyard/ipfs-desktop/releases/download/v0.20.6/IPFS-Desktop-Setup-0.20.6.exe
# 原地址
$ wget https://raw.githubusercontent.com/kubernetes/kubernetes/master/README.md
# 加速下载方法一
$ wget https://raw.staticdn.net/kubernetes/kubernetes/master/README.md
# 加速下载方法二
$ wget https://raw.fastgit.org/kubernetes/kubernetes/master/README.md
https://www.mingw-w64.org/downloads/ http://cygwin.com/install.html
]]>Tab #命令补全
Ctrl+T #建立新页
Ctrl+W #关闭标签页
Ctrl+Tab #切换标签页
Alt+F4 #关闭所有标签页
Ctrl+n #切换到第n个页签
Alt + Enter #切换到全屏状态
看好哪个网站,指定好URL,自动扒下来做成 html模版。并且所下载的css、js、图片、html文件会自动分好类保存到特定文件夹! 然后使用 模版计算工具,自动将 html模版计算合成为 网市场云建站系统 可用的模版。
http://www.templatespider.zvo.cn/#rjxz
https://developer.microsoft.com/zh-cn/microsoft-edge/webview2/
]]>